Wordpress Tutorials
- Wordpress
- Directory and file structure.
- Wordpress configuration
- Htaccess Configuration
- WP-CONTENT user playground
- Increase file size loading in phpmyadmin on localhost.
- Fatal error: Allowed memory size of x bytes
- wordpress Dashboard
- How to set local host domain or Virtual host
- Header, index and footer page.
- How to create wordpress Themes
- Html to wordpress themes
- Child Themes
- Increase Upload Max Filesize
- wp_enqueue_style & script
- How to make plugin
- Create Plugin
- Insert data into table using plugin.
- Show data from database
- Hook & Filter
- Template Or Custom page template
- Custom Login template
- How to show post on diffrent page.
- Custom widgit
- How to use contact form 7 plugin.
- Wordpress Database
- How to use Duplicator plugin
- How to fix Fatal Error: Maximum Execution Time Exceeded in WordPress
- How to debuggin mode on in wordpress
- Auto update plugin and themes
- How to Transfer WordPress
- How to change a WordPress site URL
- Top 10 issues in wordpress
- wordpress website link
Wordpress setting
Wordpress Function
wordpress top 10 problems
Important Links
How To Create A WordPress Custom Widget ?
This widget is the text widget which is used for many purpose like display your latest offers, deals or special events on your website.
It contains two fields named, title and description. So you just need to fill data under these fields from dashboard and display it on any widget section (like a sidebar or footer) of your website.
Steps to Create Custom WordPress Widget
I have created a new folder named, wordpress_widget where I have saved a newly created file widget.php. Now, save this wordpress_widget folder under the plugin folder of WordPress. (Eg. wamp -> www -> wordpress -> wp-content -> plugins)
1. Enter Plugin Details
When you create a new plugin, it is very necessary to provide all its details like- plugin name, plugin URI, its short description, author name, author URI etc. You can follow the below code and enter details according to it.
File name : index.php
<?php
/*
Plugin Name: Custom Widget
Plugin URI: https://inkthemes.com
Description: Building a Custom WordPress Widget.
Author: InkThemes
Version: 1
Author URI: https://inkthemes.com
*/
?>
2. Define Widget Name
You need to create a class (here it is wpb_widget) that encloses widget in it.
You need to create a constructor, give constructor name same as that of a class i.e. wpb_widget.
// Creating the widget
class wpb_widget extends WP_Widget {
function __construct() {
parent::__construct(
// Base ID of your widget
'wpb_widget',
// Widget name will appear in UI
__('WPBeginner Widget', 'wpb_widget_domain'),
// widget name- WPBeginner Widget
// Widget description
array( 'description' => __( 'Sample widget based on WPBeginner Tutorial', 'wpb_widget_domain' ), )
);
}
File name : index.php
<?php
class my_plugin extends WP_Widget {
// constructor
function my_plugin() {
// Give widget name here
parent::WP_Widget(false, $name = __('My Widget', 'wp_widget_plugin') );
}
?>
3. Add Functionality to Widget for Backend
You need to create a form that you will see when adding the widget in the sidebar. And then you can fill data under these form fields from backend that will ultimately display on front end.
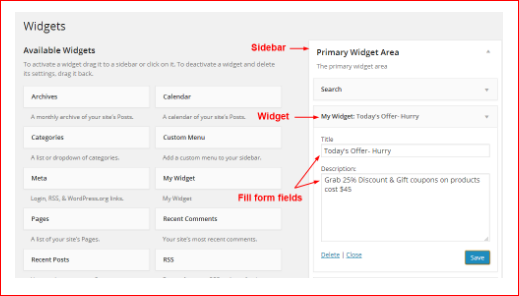
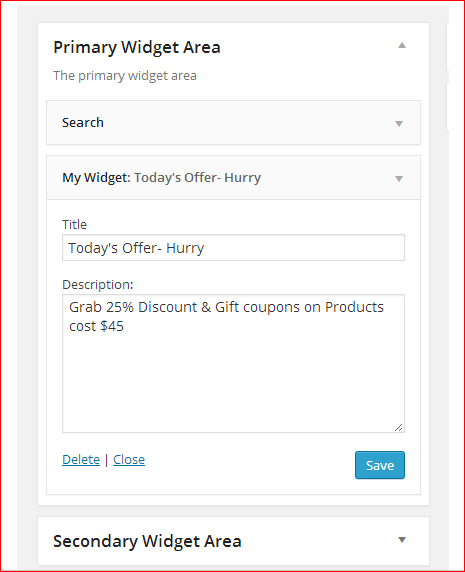
You will be more clear with a below image.

For that, you have to use a predefined function called form () that create the widget in the WordPress administration. Also define CSS code for the widget fields i.e. title and textarea, for that, just use the below code and add it under the widget.php file followed by the above piece of code.
File name : index.php
<?php
// widget form creation
function form($instance) {
// Check values
if( $instance) {
$title = esc_attr($instance['title']);
$textarea = $instance['textarea'];
} else {
$title = '';
$textarea = '';
}
?>
<p>
<label for="<?php echo $this->get_field_id('title'); ?>"><?php _e('Title', 'wp_widget_plugin'); ?></label>
<input class="widefat" id="<?php echo $this->get_field_id('title'); ?>" name="<?php echo $this->get_field_name('title'); ?>" type="text" value="<?php echo $title; ?>" />
</p>
<p>
<label for="<?php echo $this->get_field_id('textarea'); ?>"><?php _e('Description:', 'wp_widget_plugin'); ?></label>
<textarea class="widefat" id="<?php echo $this->get_field_id('textarea'); ?>" name="<?php echo $this->get_field_name('textarea'); ?>" rows="7" cols="20" ><?php echo $textarea; ?></textarea>
</p>
<?php
}
?>
4. Update Widget Data on Backend
When you click on the save button on widget form, then predefined function update() is called. This function overwrite the old value of form fields with a new value. As you can see in the below code I have used two fields in the form, so these two fields keep on updating with new valid values in backend.
File name : index.php
<?php
function update($new_instance, $old_instance) {
$instance = $old_instance;
// Fields
$instance['title'] = strip_tags($new_instance['title']);
$instance['textarea'] = strip_tags($new_instance['textarea']);
return $instance;
}
?>
5. Display Widget on Front End
In order to display widget in the front end, you need to include a widget () function in the code. This function contains two parameters $args and $instance.
$args –> associative array that will be passed as a first argument to every active widget callback
$instance –> instance variable
$before_widget –> HTML to place before widget
File name : index.php
<?php
// display widget
function widget($args, $instance) {
extract( $args );
// these are the widget options
$title = apply_filters('widget_title', $instance['title']);
$textarea = $instance['textarea'];
echo $before_widget;
// Display the widget
echo '<div class="widget-text wp_widget_plugin_box" style="width:269px; padding:5px 9px 20px 5px; border: 1px solid rgb(231, 15, 52); background: pink; border-radius: 5px; margin: 10px 0 25px 0;">';
echo '<div class="widget-title" style="width: 90%; height:30px; margin-left:3%; ">';
// Check if title is set
if ( $title ) {
echo $before_title . $title . $after_title ;
}
echo '</div>';
// Check if textarea is set
echo '<div class="widget-textarea" style="width: 90%; margin-left:3%; padding:8px; background-color: white; border-radius: 3px; min-height: 70px;">';
if( $textarea ) {
echo '<p class="wp_widget_plugin_textarea" style="font-size:15px;">'.$textarea.'</p>';
}
echo '</div>';
echo '</div>';
echo $after_widget;
}
}
?>
6. Register Widget in WordPress
You need to register widget in WordPress so that it will be available under widget section of your WordPress dashboard. To do so, you can follow the below code.
File name : index.php
<?php
// register widget
add_action('widgets_init', create_function('', 'return register_widget("my_plugin");'));
?>
output :-
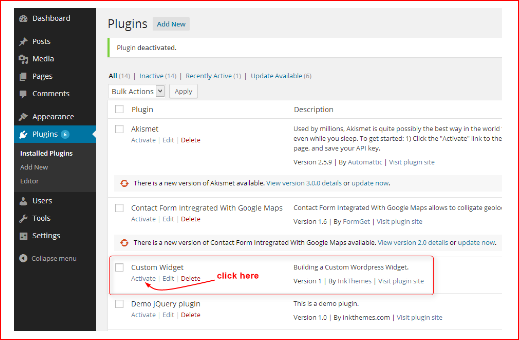
1. Plugin named, Custom Widget is listed under the plugins option of your WordPress dashboard, so you need to activate it by click on the Activate option, similar as below image.

2. Once the plugin is activated, Widget named My Widget is listed under the widget area of your WordPress dashboard, similar as below image.

3. You can place the widget under the sidebar or footer section of your website by simple drag and drop.
Now enter data in the widget fields that you want to display in the front end. As you see in the below image, I have filled two fields, Title and Description of My Widget.

Example
/*
Plugin Name: My Widget
Plugin URI: http://mydomain.com
Description: My first widget
Author: Me
Version: 1.0
Author URI: http://mydomain.com
*/
// Block direct requests
if ( !defined('ABSPATH') )
die('-1');
add_action( 'widgets_init', function(){
register_widget( 'My_Widget' );
});
/**
* Adds My_Widget widget.
*/
class My_Widget extends WP_Widget {
/**
* Register widget with WordPress.
*/
function __construct() {
parent::__construct(
'My_Widget', // Base ID
__('My Widget', 'text_domain'), // Name
array( 'description' => __( 'My first widget!', 'text_domain' ), ) // Args
);
}
/**
* Front-end display of widget.
*
* @see WP_Widget::widget()
*
* @param array $args Widget arguments.
* @param array $instance Saved values from database.
*/
public function widget( $args, $instance ) {
echo $args['before_widget'];
if ( ! empty( $instance['title'] ) ) {
echo $args['before_title'] . apply_filters( 'widget_title', $instance['title'] ). $args['after_title'];
}
echo __( 'Hello, World!', 'text_domain' );
echo $args['after_widget'];
}
/**
* Back-end widget form.
*
* @see WP_Widget::form()
*
* @param array $instance Previously saved values from database.
*/
public function form( $instance ) {
if ( isset( $instance[ 'title' ] ) ) {
$title = $instance[ 'title' ];
}
else {
$title = __( 'New title', 'text_domain' );
}
?>
<p>
<label for="<?php echo $this->get_field_id( 'title' ); ?>"><?php _e( 'Title:' ); ?></label>
<input class="widefat" id="<?php echo $this->get_field_id( 'title' ); ?>" name="<?php echo $this->get_field_name( 'title' ); ?>" type="text" value="<?php echo esc_attr( $title ); ?>">
</p>
<?php
}
/**
* Sanitize widget form values as they are saved.
*
* @see WP_Widget::update()
*
* @param array $new_instance Values just sent to be saved.
* @param array $old_instance Previously saved values from database.
*
* @return array Updated safe values to be saved.
*/
public function update( $new_instance, $old_instance ) {
$instance = array();
$instance['title'] = ( ! empty( $new_instance['title'] ) ) ? strip_tags( $new_instance['title'] ) : '';
return $instance;
}
} // class My_Widget
/*
Plugin Name: Random Post Widget
Plugin URI: http://jamesbruce.me/
Description: Random Post Widget grabs a random post and the associated thumbnail to display on your sidebar
Author: James Bruce
Version: 1
Author URI: http://jamesbruce.me/
*/
class RandomPostWidget extends WP_Widget
{
function RandomPostWidget()
{
$widget_ops = array('classname' => 'RandomPostWidget', 'description' => 'Displays a random post with thumbnail' );
$this->WP_Widget('RandomPostWidget', 'Random Post and Thumbnail', $widget_ops);
}
function form($instance)
{
$instance = wp_parse_args( (array) $instance, array( 'title' => '' ) );
$title = $instance['title'];
?>
<p><label for="<?php echo $this->get_field_id('title'); ?>">Title: <input class="widefat" id="<?php echo $this->get_field_id('title'); ?>" name="<?php echo $this->get_field_name('title'); ?>" type="text" value="<?php echo attribute_escape($title); ?>" /></label></p>
<?php
}
function update($new_instance, $old_instance)
{
$instance = $old_instance;
$instance['title'] = $new_instance['title'];
return $instance;
}
function widget($args, $instance)
{
extract($args, EXTR_SKIP);
echo $before_widget;
$title = empty($instance['title']) ? ' ' : apply_filters('widget_title', $instance['title']);
if (!empty($title))
echo $before_title . $title . $after_title;;
// WIDGET CODE GOES HERE
echo "<h1>This is my new widget!</h1>";
echo $after_widget;
}
}
add_action( 'widgets_init', create_function('', 'return register_widget("RandomPostWidget");') );?>
https://www.inkthemes.com/create-wordpress-custom-widget/
http://www.wpbeginner.com/wp-tutorials/how-to-create-a-custom-wordpress-widget/
How to create Custom widget (user defined widget) in wordpress.
step 1 : create directory under plugin directory. and create file with any name such as random-post-widget.php
step 2 : write below code in random-post-widget.php that file.
File name : random-post-widget.php
<?php
/*
Plugin Name: Random Post Widget
Plugin URI: http://jamesbruce.me/
Description: Random Post Widget grabs a random post and the associated thumbnail to display on your sidebar
Author: James Bruce
Version: 1
Author URI: http://jamesbruce.me/
*/
class RandomPostWidget extends WP_Widget
{
function RandomPostWidget()
{
$widget_ops = array('classname' => 'RandomPostWidget', 'description' => 'Displays a random post with thumbnail' );
$this->WP_Widget('RandomPostWidget', 'Random Post and Thumbnail', $widget_ops);
}
function form($instance)
{
$instance = wp_parse_args( (array) $instance, array( 'title' => '' ) );
$title = $instance['title'];
?>
<p><label for="<?php echo $this->get_field_id('title'); ?>">Title: <input class="widefat" id="<?php echo $this->get_field_id('title'); ?>" name="<?php echo $this->get_field_name('title'); ?>" type="text" value="<?php echo attribute_escape($title); ?>" /></label></p>
<?php
}
function update($new_instance, $old_instance)
{
$instance = $old_instance;
$instance['title'] = $new_instance['title'];
return $instance;
}
function widget($args, $instance)
{
extract($args, EXTR_SKIP);
echo $before_widget;
$title = empty($instance['title']) ? ' ' : apply_filters('widget_title', $instance['title']);
if (!empty($title))
echo $before_title . $title . $after_title;;
// WIDGET CODE GOES HERE
echo "<h3>This is my new widget! haaa mahtab.</h3>";
echo $after_widget;
}
}
add_action( 'widgets_init', create_function('', 'return register_widget("RandomPostWidget");') );?>
step 3 :- activate plugin
step 4 : Finally go on appearance -> widget -> finally show your widgets you created in left side and select it and add widget.
step 5 : open widgets and write title and save.